Friday 28 February 2014

How to Play PSP Games on Android


PlayStation Portables (PSP) is now very popular among gamers worldwide. So today we can try to figure out ‘How to Play PSP Games on Android?’. There is an app called PPSSPP Gold – PSP emulator on Googleplay and it can run any PSP Game on your android device. To ensure a smooth lag free gameplay I recommend to use a High End android smart phone or tablet. PPSSPP can run your PSP games on your andoid in full HD resolution, and play them on PC too. It can even upscale textures that would otherwise be too blurry as they were made for the small screen of the original PSP. Even on modern Android phones and tables, you can often run at double the original resolution.  Find some highlighted features of PPSSPP Gold – PSP emulator below:
  1. Play in HD resolutions and more
  2. Play on a tablet for big-screen mobile gaming
  3. Save and restore game state anywhere, anytime
  4. Crank up the anisotropic filtering and texture scaling
  5. Continue where you left off by transferring saves from your real PSP


Install PSP Games On Android- Instructions:

  • Download and install PPSSPP Gold – PSP emulator From here (Free) / Official site (Paid)
  • Download your favourite PSP GAMES in CSO or ISO file format. you can find a cracked version from Google easily. OR you can find desires games file from this site.
  • Place download ISO or CSO file in your SD Card or Wherever you want.
  • Open PPSSPP GOLD and then go to GAMES and find the location where you have placed the PSP GAME’s CSO or ISO file and its DONE.
  • Now Enjoy your favourite PSP Games on your Android phone.

Some Tested games:
  • Assassins Creed Bloodlines
  • Persona 2, Persona 3
  • Little Big Planet
  • Burnout Legends, Burnout Dominator
  • Final Fantasy : Crisis Core
  • Monster Hunter 2 Unite
  • Soul Calibur
  • GTA 
  • Daxter
  • Lumines
  • Worms
  • Also this app supports many other PSP games.
If you have any doubts or you want some PSP games for free, feel free to comment here below.

Saturday 22 February 2014

Easiest Method to root LG Optimus L9

lg-p760-telefons-optimus-l9-g-m-10

For Rooting LG Optimus L9 , You Will Need :
1. PC/Laptop Running Windows 7/8.
2.
LG Optimus L9 with atleast 50% battery charge left.
3. Download the Rooting Tool


Disclaimer : ROOTING VOIDS WARRANTY! Also, We are not responsible for any damage caused to the device! Make sure you backup everything like your contacts,Apps and everything that is important.


INSTRUCTIONS : 
1) Enable USB debugging [/Settings/Developer options] - 
In some devices, To enable Developer options you need to go on /Settings/About phone/ and tap your 'Build number' 8 times... 

2) Download your device drivers, then install them.... and then 

3) Download and Install VRoot 

How to Root Sony Xperia J


4) Your phone needs to be turned on and your lock screen unlocked... 

5) Click the green button on the bottom right corner of the vRoot application 

How to Root Sony Xperia  
How to Root Sony Xperia Z1


6) Now, your phone will restart by itself. (repeat the steps again if this does not work) 

7) Unplug your phone from the USB, and check to see if the Chinese version of superSU is installed. (it will look like a blue shield) 


8) Download SuperSU/ superuser. Open SuperSU/ superuser. 

9) Allow binary update, and then plug your device back into your laptop, and open vRoot. 


10) Click on superSU/ superuser (which ever you downloaded) and allow binary update (again!), then go into the superSU/ superuser settings and select 'install to system' 

11) restart your device.... done! Now your device is rooted.

CWM recovery for LG Optimus L9 for locked bootloaders

For LG Optimus L9 has recovery installation method that requires unlocking the bootloader. I'm sure many do not want to use it because it leads to a complete loss of the guarantee. This post will be useful is for those who have the phone locked bootloader.

What you need to recovery? This system utility is needed in order to, for example, make a full backup of your system, install new firmware or kernel, reset all settings. After unsuccessful experiment you do not have to restore factory firmware and say goodbye to all your data if you have made a timely backup.

I want to share with you 6 CWM Recovery for Optimus L9, for which installation you do not need a computer. This recovery tested on models P760, P765, P768 (also should work on other models).

What is needed: 
Rooted LG Optimus L9
BusyBox (must be installed in the system / xbin)


All are doing on your old risk! Preparation route-setting recovery rights and void your warranty!

Installation:
  1. Download and install L9 Recovery Installer.apk
  2. Start L9 Recovery Installer
  3. Press the Install / Update Recovery
  4. Press CWM ICS / JB (Stable)
  5. Press Yes, Install Recovery
  6. Done!
  7. With older versions can upgrade through recovery Install / Update Recovery
Loading in recovery:
  1. Select reboot to recovery from recovery intstaller app or
  2. Reboot the phone. When you see the LG logo and begin to blink wheel key, press and hold the "volume down"
  3. After entering recovery select "reboot system now" then select provided option.


Also check out:

Easiest rooting method for LG Optimus L9

Wednesday 12 February 2014

How to Fix "Can’t Adjust Brightness after Upgrading to Windows 8.1" Problem


After upgrading an older HCL laptop to Windows 8.1 recently, I ran into a very annoying problem. For whatever reason, the ability to adjust the brightness stopped working. Pressing the brightness keys on the keyboard would show that the brightness level was going up or down, but nothing actually changed on the screen! It was the weirdest thing I had ever seen.
The first thing I thought was maybe there was some hardware issue and Windows 8.1 was not recognizing the key press properly. I decided to try to change the brightness level in the OS itself. I opened the Charms bar and clicked on Settings and then tried to adjust the brightness there, but again nothing happened! Now I was really confused.

I also tried to go to Power Options and change the brightness there, but again it didn’t make any difference on the actual display. The second thought that popped into my head was that it was a driver issue. I went to the Lenovo website and downloaded the latest driver I could find for the machine. I was hoping that would fix the problem, but it didn’t!

win 8.1 brightness

At this point, I figured it could be that the latest driver doesn’t yet support Windows 8.1 properly and therefore I need to try out the standard or basic Windows graphics driver instead. In the end, this is what fixed the problem. Now I just have to wait till Lenovo releases an updated driver for  my older Lenovo laptop. Here’s how to fix the issue temporarily.
First, open the Control Panel and click on Device Manager:

control panel win 8

Next, expand Display Adapters and then right-click on the graphics card installed on your system and choose Properties. It could be something like Intel HD Graphics 4000, etc. It’ll depend on what kind of graphics card you have installed, but there really should only be one or two listed max.

display adapters properties

Now go ahead and click on the Driver tab and then click on the Update driver button.

update driver

Next you’ll have two options. You want to choose the Browse my computer for driver software option.

browse computer driver

We’re almost done, so keep going! Now go ahead and click on the Let me pick from a list of device drivers on my computer button at the bottom.

pick from list

Now you want to choose a different driver for the graphics card. You might have play around and pick a different ones and see which works for you, but the safest will always be Microsoft Basic Display Adapter.

basic display adapter

Depending on your system, you may see several drivers listed in the box, even the same driver listed multiple times. You can try some of the other ones, but if nothing works, just use the basic driver. Unfortunately, you won’t be able to run the OS at the highest resolution or frame rate if you use the basic driver, but at least you can adjust the brightness.
In my case, I simply switched to the basic driver, adjusted the brightness to where I needed it and then switched back to the original manufacturer driver. The brightness level remained at the level I had set it, so that was good. Then just check every so often to see if there is a new driver and install that when it becomes available. If you’re still having trouble adjusting the brightness on your Windows 8.1 machine

How to fix Windows 7 Hanging Issues


Today, I am going to write up a ultimate troubleshooting guide for Windows 7 hanging issues. This includes Windows 7 hanging on startup/boot, hanging when logging off, hanging when shutting down, hanging when installing programs, etc.
Even though Windows 7 is a big step forward from Windows Vista, it still has it’s share of problems. I’ve had numerous issues with Windows 7 hanging when performing routine tasks on my computer. I’ve tried to collect as many solutions that I ended up using in this guide. Hopefully, someone will be able to fix their problem by looking here rather than searching a bunch of websites.
I’ll try to make the guide more navigable by using section headers to identify what type of hanging I’m trying to deal with. That way, you can simply skip down to the part that you think might address your issue. Feel free to comment with solutions/questions!


Hanging While in Windows 7

If you are already logged into Windows and are having problems with Windows 7 hanging while opening programs or clicking on dialog boxes or right-clicking, etc, then you should try the following procedures. Usually this means there is some software installed on the computer that is causing problems with other aspects of Windows. It could be an anti-virus software or just a normal program you downloaded off the Internet. Either way, the best way to see if this is really the issue is to perform a clean boot.

Step 1: Log into Windows 7 with Administrator rights, click on the Start button and type in MSCONFIG in the search box.

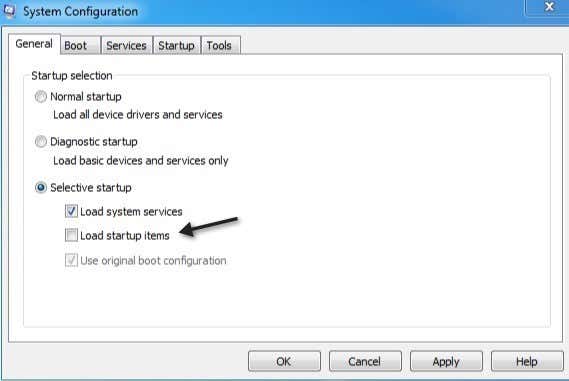
Step 2: Click on the General tab and and choose Selective Startup. Make sure to uncheck the box that says “Load Startup Items“.
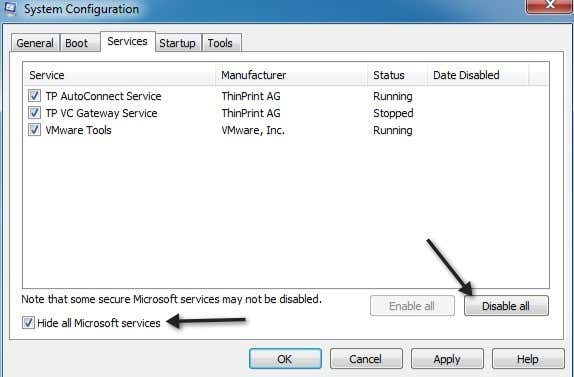
windows 7 hangs

Now click on the Services tab and check the box that says “Hide all Microsoft services“. Then click on the Disable All button.

msconfig

Click OK and then restart your computer. If you find that Windows is not hanging anymore, then you can be 100% sure that it’s a problem with a third-party program or service. There is no easy way to determine which startup item or which service is causing the problem. You basically have to manually figure it out by re-enabling half the startup items and then restarting. If the problem comes back, you know that the problem item is in that list of checked items. Then you check half of those and restart again. You would have to do the same procedure with the services if it’s not a startup item causing the problem. Eventually, you will only have one item checked and that will be causing the hanging.

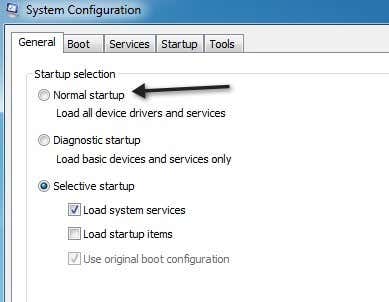
Once you know what program it is, go ahead and uninstall it. Uninstalling the program will also disable any services associated with that program. Then you can go back to the MSCONFIG utility and choose Normal Startup.

normal startup


Windows 7 Hangs at Startup – Classpnp.sys

One of the more nasty hanging issues in Windows 7 is when it hangs during the boot up on the “Starting Windows” screen. I’ve seen this issue with many clients and boy it can be a real pain because a lot of the recommended fixes (using system repair or system restore) don’t work!
If you try running Windows 7 in Safe Mode, it fails at Classpnp.sys. What we figured out was that this issue could be related to a couple of things. The first thing to try is the startup repair or system restore using the DVD. You can read online how to boot from DVD and get to these options. There are a ton of guides out there, so I won’t repeat that info. Just make sure to go into the BIOS and set Boot from CD/DVD as the 1st priority above Hard Disk.

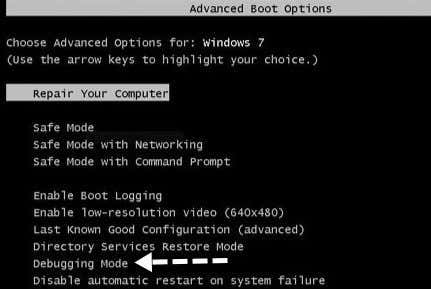
If that doesn’t work, try restarting Windows in Debugging Mode. You can restart the computer and press F8 to get a list of boot options, which includes Safe Mode, Last Known Good Configuration, etc. Sometimes Windows will load in debugging mode and then you can restart the computer and it will start up in normal mode fine.

win 7 debugging mode

Now the real problem comes in with people who try to use the DVD and it hangs on “loading files”, which means you can never even get to the system repair or system restore options. That usually means it’s a hardware problem. Some people have gotten stuck at the classpnp.sys part after performing a Windows update, which means it could be related to software.

- In this case, you can try Last Known Good Configuration or try booting into Safe Mode and then uninstalling any Windows update by going to Control Panel – Programs dialog. If you can get into Safe Mode, you can also try running chkdsk, sfc /scannow, or trying a system restore.

- If it’s hardware-related, you need to examine how old your hardware is and if anything could have possibly failed. For example, a bad memory slot can cause this issue. Remove one memory chip at a time and see if the issue goes away. Make sure that the memory is properly inserted into the slot. A lot of times the memory doesn’t get pushed in all the way and it causes all kinds of crazy issues. Also, try to replace the memory chips and see if that works. It’s amazing how many chips go bad.

- If you’re having this issue on a desktop, you need to open it up and check to make sure that all the cables and all the cards are properly plugged into their respective slots. Make sure to check the power supply and ensure that the power going into the motherboard is OK. If there is a lot of dust in the system, use some compressed air and clean it out good. This may sound like a bit much, but if you can’t even boot the DVD without it hanging, you have a hardware issue, not a software problem.

- Next, you need to go into the BIOS and disable all the hardware including USB ports, sound card, floppy disk, 1394, media card, network card, etc. Try to use the internal/onboard graphics card rather than the dedicated card. If you can’t disable something, try disconnecting it. For example, if you have a DVD drive(s), then go ahead and disconnect them from the system internally. I’ve had a client whose DVD drive was causing the system to hang. Try to boot up now and see if you can get past the hanging screen. If so, then it’s definitely a piece of hardware causing the issue.

- Another piece of hardware to check on is a USB multi-slot card reader. If you have it attached to your computer during boot up, it can sometimes try to use that as a boot device and fail. Go ahead and disconnect any peripherals attached to the computer.

- If you’re using any kind of KVM switch for multiple keyboards/mice, then go ahead and unplug that and plug in a PS2 mouse/keyboard into your computer. A lot of those KVM switches use USB and for whatever weird reason, it can cause problems with the boot process on certain machines.

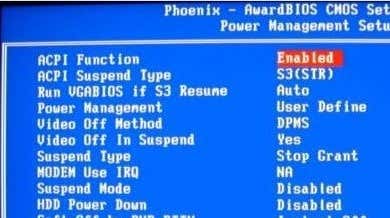
- Also, others have had success by changing the HDD settings related to ACPI. Try enabling and disabling this feature and try to restart your computer. There are a lot of settings in the BIOS and you can try to go through one by one and change a setting, restart, and if it doesn’t work, then change it back and change a different setting. It’s impossible to say what settings in the BIOS can make the system hang, but a good number of folks have had success by changing settings there.

acpi

- Speaking of hard drives, you can also check to see if your hard drive config is set to RAID. If so, change it to IDE. This may allow you to boot from the CD/DVD and therefore run the Startup Repair tools like memory diagnostic. If you get back into Windows, you can then do a system restore, etc.

- A few people have also had success by resetting their BIOS. You can reset the BIOS by clearing out the CMOS. You can clear out the CMOS in several ways including pressing a button on your motherboard, changing a jumper setting, etc. You will need to perform a Google search for your particular machine to find out how to clear the CMOS.

- If you’re still going strong and trying to solve this issue, you can really put your tech skills to use by trying to replace the classpnp.sys file with a copy from another computer. The location of the file is C:\Windows\system32\classpnp.sys. Of course, Windows won’t load, so you can only do this using a Linux, like an Ubuntu Live CD. You’ll have to Google how to copy files using this, but it’s really not too bad. It has worked for several people, so it’s worth a shot.
As a last resort, you can try using some spare parts if you have any and replace as much as you can: graphics card, sound card, hard drive, etc.


Windows 7 Hangs at Shutdown

If you’re having issues with Windows 7 hanging up while shutting down, then you’re luckier than the previous set of campers. That’s because you can at least get into Windows and normally it’s only a software/program issue in which Windows is not able to unload or kill a certain process, etc. That’s much easier to deal with than messing around with hardware, the BIOS, and all kinds of crazy repair tools.

Note that the first thing to try is to restart the computer in Safe Mode and then perform a shutdown. If the computer hangs while shutting down in Safe Mode, it could be a hardware issue. If it restarts fine, then it’s probably a software issue related to Windows when it loads all the normal drivers and processes.

Here are a couple of things you can try, which should solve your problem eventually:

- Go ahead and install the latest Windows updates. There are a few hotfixes that Microsoft has released that pertain to this exact issue and therefore could solve your problem without you having to do anything.

- Next up is hardware attached to your computer. Unplug all USB devices, network cords, firewire, HDMI, etc and then try to do a restart. If you’re lucky, it could be as simple as that.

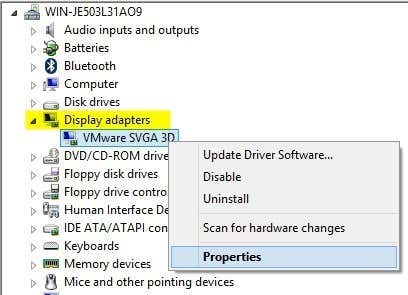
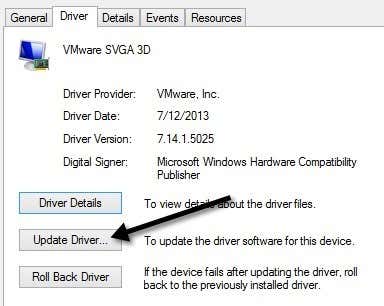
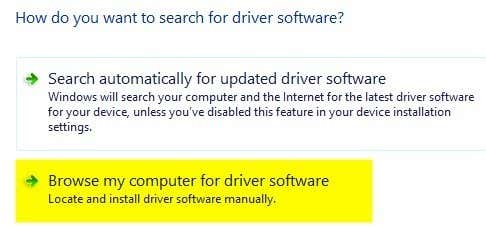
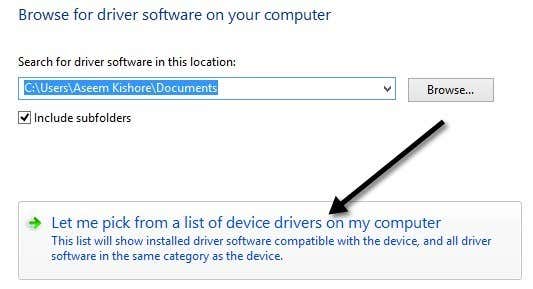
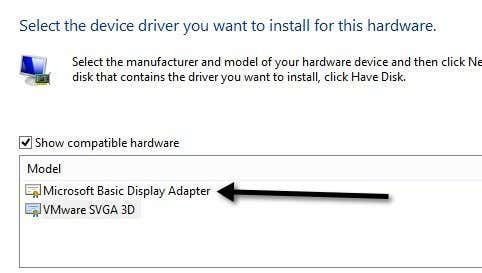
- Also, it’s best to update all the drivers for any hardware on your computer including network cards, graphics cards, sound cards, card readers, etc, especially if you’re running Windows 7 64-bit. If you don’t have a compatible driver installed, it can cause the shutdown problem.

- After that, check out the software on your computer. If you’re running 64-bit Windows, you need to uninstall any third party apps that could be causing conflicts. One client had 7-zip installed and it was causing Windows 7 to hang on shutdown. Another client was using the Sticky Notes app that Microsoft wrote! After putting a note on his desktop, the computer started hanging. Removing the note and the app fixed the problem. It’s best to check any freeware apps you may have downloaded and try uninstalling them. Other programs include anti-spyware apps or anti-virus apps, which could definitely cause this type of problem.

- In addition to third-party apps, disable any extra programs that may be running in the taskbar, such as graphics card

- If you’re still having issues, it could be a problem with a Windows service. This is a bit trickier because it’s hard to figure out which service could be causing the problem. The best way to see if it’s a service problem is to go to MSCONFIG, click on Services, check the box to hide all Microsoft services and then uncheck everything that is left over. Those are all third-party services. You will have to kill the computer after doing this, but all the services should be stopped when you log back into Windows. Then try to shutdown like normal and see if you are able to do so. Then manually enable one service at a time until you find the culprit.

If you follow the steps mentioned above thoroughly, you will be able to fix this problem. If you can’t or if you need some more help with certain instructions, then post a comment here and we’ll try to help!

How to Create an ISO File from a Folder in Windows


Using ISO files is a very popular way of distributing a large amount of files over the internet. A lot of software packages are available online as ISO files you can download. ISO files can also be used to easily back up files, such as photos, videos, or programs you have downloaded, in an easy-to-access form on a hard drive or a CD/DVD.

I found a free, portable tool, called Folder2ISO, that allows you to create ISO files from folders in Windows. You can mount ISO images for free in Windows using Virtual CloneDrive and you can easily burn ISO images to CD or DVD in Windows using ISO Recorder.

Download Folder2ISO

Folder2ISO is a portable program that does not require any installation. To run the program, extract the file you downloaded and double-click on the resulting .exe file.

Running Folder2ISO

To choose a folder from which you want to create an ISO file, click Select Folder.

Clicking Select Folder

The Browse For Folder dialog box displays. Navigate to the folder you want to convert to an ISO file, select the folder, and click OK.

Browsing for a folder

To select the location for the ISO file, click Select Output.

Clicking Selecting Output

On the Save As dialog box, navigate to the folder in which you want to save the ISO file. Enter a name for the ISO file in the File name edit box and click Save.
NOTE: You cannot save the ISO file in the same folder you are converting to the ISO file. You must select a different location.

Selecting an output folder and naming the ISO file

Enter a label for the ISO file in the Label Of The Iso edit box.

Entering a label for the ISO file

You can select a different character set by selecting an option from the Charset drop-down list. For information about what languages are covered in each character set, click the question mark button.

Getting help about Charset

The Charsets dialog box displays, listing the languages each character set covers. To close the dialog box, click the X button in the upper, right corner.

Charsets definitions

Once you have chosen the folder to convert to an ISO file and the output location, and set the remaining options, click Generate Iso to create the ISO file.

Clicking Generate Iso

The progress of the ISO file generation displays at the bottom of the Folder2ISO dialog box. If you want to stop the generation of the ISO file, click Abort.

ISO file generation progress

When the ISO file has been generated, a dialog box displays telling you the process is All Done. Click OK to close the dialog box.

All Done dialog box

Folder2ISO is a front end interface for the Mkisofs program. Mkisofs is used to write file systems, such as iso9660, that are used to create CDROMs. By default, the Hide Mkisofs check box is selected so you don’t see the status of Mkisofs running in the background. If you want to see that status, select the Hide Mkisofs check box so there is no check mark in the box. A command window displays showing the percentage complete of the Mkisofs process. The command window automatically closes when the Mkisofs process completes.

Command window that displays for Mkisofs

The completed ISO file is written to the output location you specified. We have installed Virtual CloneDrive so we can mount ISO files and view and access files in ISO files as if they were on a CD or DVD. Because Virtual CloneDrive is installed, the Type for the ISO file we created in this example is listed as Virtual CloneDrive, allowing us to easily mount the ISO file and view and access what’s inside. For more information about using Virtual CloneDrive, see our post, Mount ISO Images in Windows for Free.

ISO file created

To close Folder2ISO, click the X button in the upper, right corner of the dialog box.

Closing Folder2ISO

Now, we can easily back up our downloaded programs either by burning the ISO file to DVD or by copying the ISO file to an external drive. The files in the ISO file are easily accessed either way.


Downloads:


tags;
How to convert folder to iso
convert folder to iso
converting folder to iso.
folder to iso